达人探店
查看笔记
查询博客详情接口的同时,重构了一下查询热点博客的接口
1
2
3
4
5
6
7
8
9
10
11
12
13
14
15
16
17
18
19
20
21
22
23
24
25
26
27
28
29
30
31
32
33
34
35
36
37
38
| @Service
public class BlogServiceImpl extends ServiceImpl<BlogMapper, Blog> implements IBlogService {
@Resource
private IUserService userService;
@Override
public Result queryHotBlog(Integer current) {
Page<Blog> page = query()
.orderByDesc("liked")
.page(new Page<>(current, SystemConstants.MAX_PAGE_SIZE));
List<Blog> records = page.getRecords();
records.forEach(this::queryUserByBlog);
return Result.ok(records);
}
@Override
public Result queryBlogById(Long id) {
Blog blog = getById(id);
if (blog == null){
return Result.fail("博客不存在");
}
queryUserByBlog(blog);
return Result.ok(blog);
}
private void queryUserByBlog(Blog blog) {
Long userId = blog.getUserId();
User user = userService.getById(userId);
blog.setName(user.getNickName());
blog.setIcon(user.getIcon());
}
}
|
点赞功能
使用Redis的Set实现一人只能点赞一次
- 给Blog类中添加一个isLike字段,标示是否被当前用户点赞
- 利用Redis的set集合判断是否点赞过,未点赞过则点赞数+1,已点赞过则点赞数-1
- 修改根据id查询Blog的业务,判断当前登录用户是否点赞过,赋值给isLike字段
- 修改分页查询Blog业务,判断当前登录用户是否点赞过,赋值给isLike字段
1
2
3
4
5
6
7
8
9
10
11
12
13
14
15
16
17
18
19
20
21
22
23
24
25
26
27
28
29
30
31
32
33
34
35
36
37
38
39
40
41
42
43
44
45
46
47
48
49
50
51
52
53
54
55
56
57
58
59
60
61
62
63
64
65
66
67
68
69
70
71
72
73
74
75
76
77
78
79
80
81
82
| @Service
public class BlogServiceImpl extends ServiceImpl<BlogMapper, Blog> implements IBlogService {
@Resource
private IUserService userService;
@Resource
private StringRedisTemplate stringRedisTemplate;
@Override
public Result queryHotBlog(Integer current) {
Page<Blog> page = query()
.orderByDesc("liked")
.page(new Page<>(current, SystemConstants.MAX_PAGE_SIZE));
List<Blog> records = page.getRecords();
records.forEach(blog -> {
this.queryUserByBlog(blog);
this.isBlogLiked(blog);
});
return Result.ok(records);
}
@Override
public Result queryBlogById(Long id) {
Blog blog = getById(id);
if (blog == null){
return Result.fail("博客不存在");
}
queryUserByBlog(blog);
isBlogLiked(blog);
return Result.ok(blog);
}
private void isBlogLiked(Blog blog) {
Long userId = UserHolder.getUser().getId();
String key = "blog:liked:" + blog.getId();
Boolean isMember = stringRedisTemplate.opsForSet().isMember(key, userId.toString());
blog.setIsLike(BooleanUtil.isTrue(isMember));
}
@Override
public Result likeBlog(Long id) {
Long userId = UserHolder.getUser().getId();
String key = "blog:liked:" + id;
Boolean isMember = stringRedisTemplate.opsForSet().isMember(key, userId.toString());
if (BooleanUtil.isFalse(isMember)) {
boolean isSuccess = update().setSql("liked = liked + 1").eq("id", id).update();
if (isSuccess) {
stringRedisTemplate.opsForSet().add(key, userId.toString());
}
} else {
boolean isSuccess = update().setSql("liked = liked - 1").eq("id", id).update();
if (isSuccess) {
stringRedisTemplate.opsForSet().remove(key, userId.toString());
}
}
return Result.ok();
}
private void queryUserByBlog(Blog blog) {
Long userId = blog.getUserId();
User user = userService.getById(userId);
blog.setName(user.getNickName());
blog.setIcon(user.getIcon());
}
}
|
点赞排行榜
SortedSet
1
2
3
4
5
6
7
8
9
10
11
12
13
14
15
16
17
18
19
20
21
22
23
24
25
26
27
28
29
30
31
32
33
34
35
36
37
38
39
40
41
42
43
44
45
46
47
48
49
50
51
52
53
54
55
56
57
58
59
60
61
62
63
64
65
66
67
68
69
70
71
72
73
74
75
76
77
78
79
80
81
82
83
84
85
86
87
88
89
90
91
92
93
94
95
96
97
98
99
100
101
102
103
104
105
106
107
108
109
110
111
112
| @Service
public class BlogServiceImpl extends ServiceImpl<BlogMapper, Blog> implements IBlogService {
@Resource
private IUserService userService;
@Resource
private StringRedisTemplate stringRedisTemplate;
@Override
public Result queryHotBlog(Integer current) {
Page<Blog> page = query()
.orderByDesc("liked")
.page(new Page<>(current, SystemConstants.MAX_PAGE_SIZE));
List<Blog> records = page.getRecords();
records.forEach(blog -> {
this.queryUserByBlog(blog);
this.isBlogLiked(blog);
});
return Result.ok(records);
}
@Override
public Result queryBlogById(Long id) {
Blog blog = getById(id);
if (blog == null) {
return Result.fail("博客不存在");
}
queryUserByBlog(blog);
isBlogLiked(blog);
return Result.ok(blog);
}
private void isBlogLiked(Blog blog) {
UserDTO user = UserHolder.getUser();
if (user == null) {
return;
}
Long userId = user.getId();
String key = BLOG_LIKED_KEY + blog.getId();
Double score = stringRedisTemplate.opsForZSet().score(key, userId.toString());
blog.setIsLike(score != null);
}
@Override
public Result likeBlog(Long id) {
Long userId = UserHolder.getUser().getId();
String key = BLOG_LIKED_KEY + id;
Double score = stringRedisTemplate.opsForZSet().score(key, userId.toString());
if (score == null) {
boolean isSuccess = update().setSql("liked = liked + 1").eq("id", id).update();
if (isSuccess) {
stringRedisTemplate.opsForZSet().add(key, userId.toString(), System.currentTimeMillis());
}
} else {
boolean isSuccess = update().setSql("liked = liked - 1").eq("id", id).update();
if (isSuccess) {
stringRedisTemplate.opsForZSet().remove(key, userId.toString());
}
}
return Result.ok();
}
@Override
public Result queryBlogLikes(Long id) {
String key = BLOG_LIKED_KEY + id;
Set<String> top5 = stringRedisTemplate.opsForZSet().range(key, 0, 4);
if (top5 == null || top5.isEmpty()) {
return Result.ok(Collections.emptyList());
}
List<Long> ids = top5.stream().map(Long::valueOf).collect(Collectors.toList());
String idsStr = StrUtil.join(",", ids);
List<UserDTO> userDTOS = userService.query()
.in("id", ids).last("ORDER BY FIELD(id," + idsStr + ")").list()
.stream()
.map(user -> BeanUtil.copyProperties(user, UserDTO.class))
.collect(Collectors.toList());
return Result.ok(userDTOS);
}
private void queryUserByBlog(Blog blog) {
Long userId = blog.getUserId();
User user = userService.getById(userId);
blog.setName(user.getNickName());
blog.setIcon(user.getIcon());
}
}
|
好友关注
关注和取关
两个接口:
FollowController:负责接收请求、返回响应
1
2
3
4
5
6
7
8
9
10
11
12
13
14
15
16
17
18
19
20
21
22
23
24
25
26
27
28
| @RestController
@RequestMapping("/follow")
public class FollowController {
@Resource
private IFollowService followService;
@PutMapping("/{id}/{isFollow}")
public Result follow(@PathVariable("id") Long followUserId, @PathVariable("isFollow") Boolean isFollow){
return followService.follow(followUserId, isFollow);
}
@GetMapping("/or/not/{id}")
public Result isFollow(@PathVariable("id") Long followUserId){
return followService.isFollow(followUserId);
}
}
|
FollowServiceImpl:负责业务逻辑处理
1
2
3
4
5
6
7
8
9
10
11
12
13
14
15
16
17
18
19
20
21
22
23
24
25
26
27
28
29
30
31
32
33
34
35
36
37
38
39
40
41
42
43
| @Service
public class FollowServiceImpl extends ServiceImpl<FollowMapper, Follow> implements IFollowService {
@Override
public Result follow(Long followUserId, Boolean isFollow) {
Long userId = UserHolder.getUser().getId();
if (isFollow) {
Follow follow = new Follow();
follow.setUserId(userId);
follow.setFollowUserId(followUserId);
save(follow);
} else {
remove(new LambdaQueryWrapper<Follow>()
.eq(Follow::getUserId, userId)
.eq(Follow::getFollowUserId, followUserId));
}
return Result.ok();
}
@Override
public Result isFollow(Long followUserId) {
Long userId = UserHolder.getUser().getId();
int count = count(new LambdaQueryWrapper<Follow>()
.eq(Follow::getUserId, userId)
.eq(Follow::getFollowUserId, followUserId));
return Result.ok(count > 0);
}
}
|
共同关注
Set实现,取交集。前提:首先要把用户的关注列表保存到Redis中
1
2
3
4
5
6
7
8
9
10
11
12
13
14
15
16
17
18
19
20
21
22
23
24
25
26
27
28
29
30
31
32
33
34
35
36
37
38
39
40
41
42
43
44
45
46
47
48
49
50
51
52
53
54
55
56
57
58
59
60
61
62
63
64
65
66
67
68
69
70
71
72
73
74
75
76
77
78
79
80
81
82
83
84
| @Service
public class FollowServiceImpl extends ServiceImpl<FollowMapper, Follow> implements IFollowService {
@Resource
private StringRedisTemplate stringRedisTemplate;
@Resource
private IUserService userService;
@Override
public Result follow(Long followUserId, Boolean isFollow) {
Long userId = UserHolder.getUser().getId();
String key = "follows" + userId;
if (isFollow) {
Follow follow = new Follow();
follow.setUserId(userId);
follow.setFollowUserId(followUserId);
boolean isSuccess = save(follow);
if (isSuccess) {
stringRedisTemplate.opsForSet().add(key, followUserId.toString());
}
} else {
boolean isSuccess = remove(new LambdaQueryWrapper<Follow>()
.eq(Follow::getUserId, userId)
.eq(Follow::getFollowUserId, followUserId));
if (isSuccess) {
stringRedisTemplate.opsForSet().remove(key, followUserId);
}
}
return Result.ok();
}
@Override
public Result isFollow(Long followUserId) {
Long userId = UserHolder.getUser().getId();
int count = count(new LambdaQueryWrapper<Follow>()
.eq(Follow::getUserId, userId)
.eq(Follow::getFollowUserId, followUserId));
return Result.ok(count > 0);
}
@Override
public Result followCommons(Long id) {
Long userId = UserHolder.getUser().getId();
String curUserKey = "follows:" + userId;
String targetUserKey = "follows:" + id;
Set<String> intersect = stringRedisTemplate.opsForSet().intersect(curUserKey, targetUserKey);
if (intersect == null || intersect.isEmpty()) {
return Result.ok(Collections.emptyList());
}
List<Long> commonsIds = intersect.stream().map(Long::valueOf).collect(Collectors.toList());
List<UserDTO> collect = userService.listByIds(commonsIds)
.stream()
.map((user) -> BeanUtil.copyProperties(user, UserDTO.class))
.collect(Collectors.toList());
return Result.ok(collect);
}
}
|
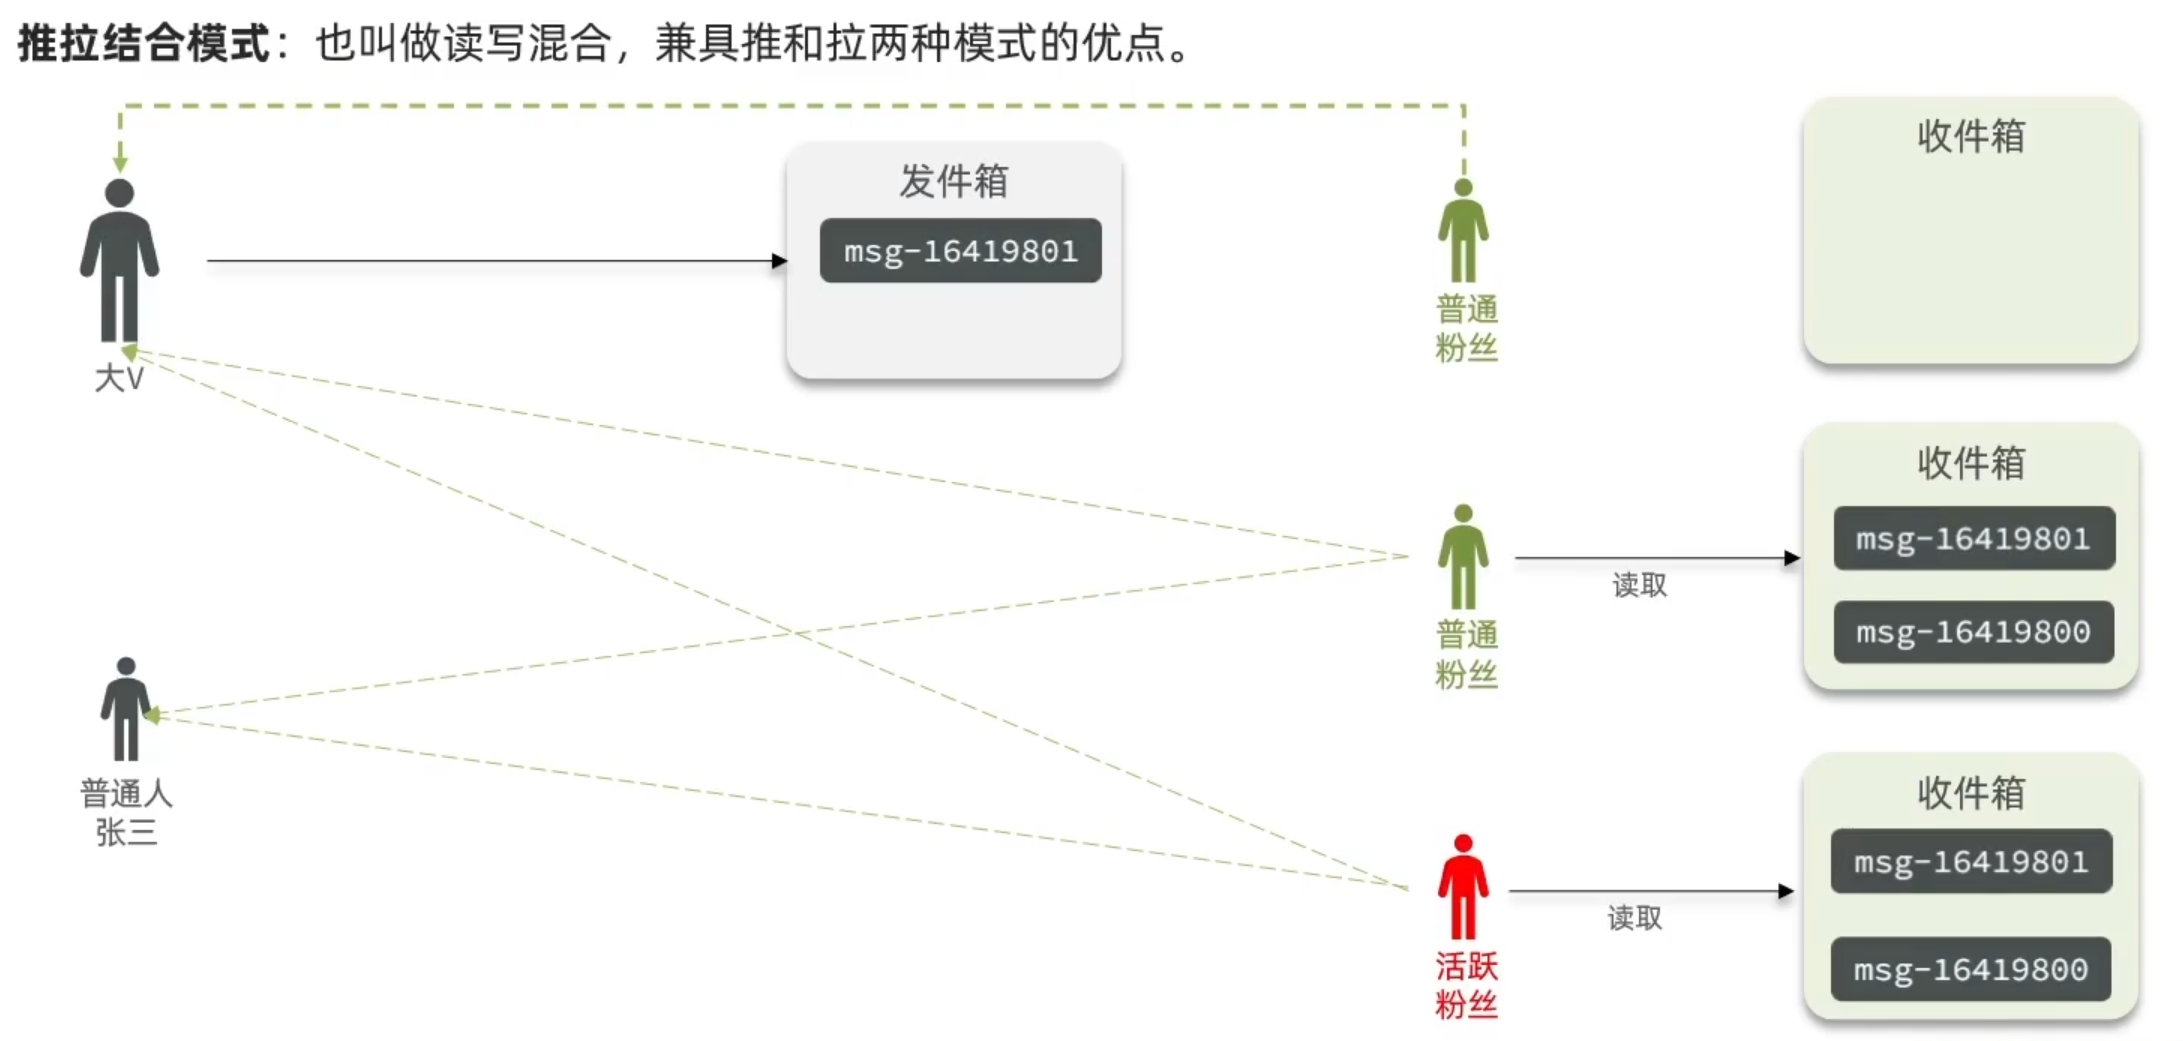
Feed关注推送
分析
实现
基于 推模式 实现,且要实现
分页
- 传统分页(
list依赖角标不行)模式:用页码进行分页
- 滚动分页模式(不依赖角标),使用
SortedSet,可以按照Score排序(Score默认按照时间戳生成,所以是固定的):会不断有新增的,不可以使用页码,而是采用score
推送功能(BlogServiceImpl)
1
2
3
4
5
6
7
8
9
10
11
12
13
14
15
16
17
18
19
20
21
22
| @Override
public Result saveBlog(Blog blog) {
UserDTO user = UserHolder.getUser();
blog.setUserId(user.getId());
boolean isSuccess = save(blog);
if (!isSuccess) {
return Result.fail("新增笔记失败!");
}
List<Follow> follows = followService.query().eq("follow_user_id", user.getId()).list();
List<Long> followsIds = follows.stream().map(Follow::getUserId).collect(Collectors.toList());
for (Long followsId : followsIds) {
String key = FEED_KEY + followsId;
stringRedisTemplate.opsForZSet().add(key, blog.getId().toString(), System.currentTimeMillis());
}
return Result.ok(blog.getId());
}
|
分页查询
BlogController
1
2
3
4
5
6
7
| @GetMapping("/of/follow")
public Result queryBlogOfFollow(
@RequestParam("lastId") Long max, @RequestParam(value = "offset", defaultValue = "0") Integer offset) {
return blogService.queryBlogOfFollow(max, offset);
}
|
BlogServiceImpl
由于要求查询后有序,因此不饿能直接使用query.in,而要加上ORDER BY
1
2
| String blogIdStr = StrUtil.join(",", blogIds);
List<Blog> blogs = query().in("id", blogIds).last("ORDER BY FIELD(id," + blogIdStr + ")").list();
|
完整代码
1
2
3
4
5
6
7
8
9
10
11
12
13
14
15
16
17
18
19
20
21
22
23
24
25
26
27
28
29
30
31
32
33
34
35
36
37
38
39
40
41
42
43
44
45
46
47
48
49
|
@Override
public Result queryBlogOfFollow(Long max, Integer offset) {
String key = FEED_KEY + UserHolder.getUser().getId();
Set<ZSetOperations.TypedTuple<String>> typedTuples = stringRedisTemplate.opsForZSet()
.reverseRangeByScoreWithScores(key, 0, max, offset, 2);
if (typedTuples == null || typedTuples.isEmpty()) {
return Result.ok();
}
List<Long> blogIds = new ArrayList<>(typedTuples.size());
long minTime = 0;
int os = 1;
for (ZSetOperations.TypedTuple<String> tuple : typedTuples) {
blogIds.add(Long.valueOf(tuple.getValue()));
long scoreTime = tuple.getScore().longValue();
if (minTime == scoreTime) {
os++;
} else {
minTime = scoreTime;
os = 1;
}
}
String blogIdStr = StrUtil.join(",", blogIds);
List<Blog> blogs = query().in("id", blogIds).last("ORDER BY FIELD(id," + blogIdStr + ")").list();
for(Blog blog:blogs){
queryUserByBlog(blog);
isBlogLiked(blog);
}
ScrollResult scrollResult = new ScrollResult();
scrollResult.setList(blogs);
scrollResult.setOffset(os);
scrollResult.setMinTime(minTime);
return Result.ok(scrollResult);
}
|
附近商铺
GEO数据类型:Geolocation的简写形式,代表地理坐标。
常见指令:
- GEOADD:添加一个地理空间信息,包含:经度(longitude)、纬度(latitude)、值(member)
- GEODIST:计算指定的两个点之间的距离并返回
- GEOHASH:将指定member的坐标转为hash字符串形式并返回
- GEOPOS:返回指定member的坐标
- GEORADIUS:指定圆心、半径,找到该圆内包含的所有member,并按照与圆心之间的距离排序后返回。6.2以后已废弃
- GEOSEARCH:在指定范围内搜索member,并按照与指定点之间的距离排序后返回。范围可以是圆形或矩形。6.2.新功能
- GEOSEARCHSTORE:与GEOSEARCH功能一致,不过可以把结果存储到一个指定的key。 6.2.新功能
实例:
1
2
3
4
5
6
| # 添加坐标数据
GEOADD g1 116.378248 39.865275 bjn 116.42803 39.903738 bjz 116.322287 39.893729 bjx
# 计算北京西站到北京站的距离
GEODIST g1 bjx bjz km
# 搜索天安门附近10km内的所有火车站,并按照距离升序排序
GEOSEARCH g1 FROMLONLAT 116.397904 39.909005 BYRADIUS 10 km WITHDIST
|
附近店铺搜索
商铺类型进行分组,类型相同的商户分为一组,以typeId作为key同时存入一个GEO集合中。
导入店铺数据到 Redis GEO
1
2
3
4
5
6
7
8
9
10
11
12
13
14
15
16
17
18
19
20
21
22
23
24
25
26
27
|
@Test
void loadShopData() {
List<Shop> list = shopService.list();
Map<Long, List<Shop>> map = list.stream().collect(Collectors.groupingBy(Shop::getTypeId));
for (Map.Entry<Long, List<Shop>> entry : map.entrySet()) {
Long typeId = entry.getKey();
String key = "shop:geo" + typeId;
List<Shop> value = entry.getValue();
List<RedisGeoCommands.GeoLocation<String>> locations = new ArrayList<>();
for (Shop shop : value) {
locations.add(new RedisGeoCommands.GeoLocation<>(
shop.getId().toString(),
new Point(shop.getX(), shop.getY())
));
}
stringRedisTemplate.opsForGeo().add(key, locations);
}
}
|
编写查询代码
1
2
3
4
5
6
7
8
9
10
11
12
13
14
15
|
@GetMapping("/of/type")
public Result queryShopByType(
@RequestParam("typeId") Integer typeId,
@RequestParam(value = "current", defaultValue = "1") Integer current,
@RequestParam(value = "x",required = false)Double x,
@RequestParam(value = "y",required = false)Double y
) {
return shopService.queryShopByType(typeId,current,x,y);
}
|
pom依赖要进行处理,redis更改版本
1
2
3
4
5
6
7
8
9
10
11
12
13
14
15
16
17
18
19
20
21
22
23
24
25
26
27
28
29
30
31
32
33
34
35
36
37
38
39
40
41
42
43
44
45
46
47
48
49
50
51
52
53
| @Override
public Result queryShopByType(Integer typeId, Integer current, Double x, Double y) {
if (x == null || y == null) {
Page<Shop> page = query()
.eq("type_id", typeId)
.page(new Page<>(current, SystemConstants.DEFAULT_PAGE_SIZE));
return Result.ok(page.getRecords());
}
int from = (current - 1) * SystemConstants.DEFAULT_PAGE_SIZE;
int end = current * SystemConstants.DEFAULT_PAGE_SIZE;
String key = SHOP_GEO_KEY + typeId;
GeoResults<RedisGeoCommands.GeoLocation<String>> results = stringRedisTemplate.opsForGeo()
.search(
key, GeoReference.fromCoordinate(x, y),
new Distance(5000),
RedisGeoCommands.GeoSearchCommandArgs.newGeoSearchArgs().includeDistance()
.limit(end)
);
if (results == null) {
return Result.ok(Collections.emptyList());
}
List<GeoResult<RedisGeoCommands.GeoLocation<String>>> list = results.getContent();
if (list.size() <= from) {
return Result.ok(Collections.emptyList());
}
List<Long> shopIds = new ArrayList<>(list.size());
Map<Long, Double> distanceMap = new HashMap<>(list.size());
list.stream().skip(from).forEach(
result -> {
Long id = Long.valueOf(result.getContent().getName());
shopIds.add(id);
distanceMap.put(id, result.getDistance().getValue());
}
);
String idStr = StrUtil.join(",", shopIds);
List<Shop> shops = query().in("id", shopIds).last("ORDER BY FIELD(id," + idStr + ")").list();
for (Shop shop : shops) {
shop.setDistance(distanceMap.get(shop.getId()));
}
return Result.ok(shops);
}
|
用户签到
BitMap 把每一个bit位对应当月的每一天,位图
BitMap的操作命令有:
签到功能
BitMap封装在了String数据结构里面,ValueOperations
1
2
3
4
5
6
7
8
9
10
11
12
13
14
15
| @Override
public Result sign() {
Long userId = UserHolder.getUser().getId();
LocalDateTime now = LocalDateTime.now();
String keySuffix = now.format(DateTimeFormatter.ofPattern(":yyyy:MM"));
String key = USER_SIGN_KEY + userId + keySuffix;
int dayOfMonth = now.getDayOfMonth() - 1;
stringRedisTemplate.opsForValue().setBit(key, dayOfMonth, true);
return Result.ok();
}
|
签到统计
步骤:
- 得到本月到今天为止的签到数据:
BITFIELD key GET u[dayOfMonth] 0
- 从后向前遍历每个bit位:使用与1相与的位运算,随后右移
- 遇到第一次未签到为止:条件判断语句
1
2
3
4
5
6
7
8
9
10
11
12
13
14
15
16
17
18
19
20
21
22
23
24
25
26
27
28
29
30
31
32
33
34
35
36
37
38
39
40
41
42
| @Override
public Result signCount() {
Long userId = UserHolder.getUser().getId();
String nowMonth = LocalDateTime.now().format(DateTimeFormatter.ofPattern(":yyyy:MM"));
String key = USER_SIGN_KEY + userId + nowMonth;
int dayOfMonth = LocalDateTime.now().getDayOfMonth();
List<Long> result = stringRedisTemplate.opsForValue().bitField(
key, BitFieldSubCommands.create()
.get(BitFieldSubCommands.BitFieldType.unsigned(dayOfMonth))
.valueAt(0));
if (result == null || result.isEmpty()) {
return Result.ok(0);
}
Long number = result.get(0);
if (number == null || number == 0) {
return Result.ok(0);
}
int count = 0;
while (true) {
if ((number & 1) == 0) {
break;
} else {
count++;
}
number >>>= 1;
}
return Result.ok(count);
}
|
可以通过SETBIT命令进行补签
SETBIT sign:2:202307 0 1
UV统计
- UV:Unique Visitor,独立访客量,一天内同一个用户多次访问,只记录一次
- PV:Page View,页面访问量(点击量),衡量网站的流量
HyperLogLog用法
HLL是从Loglog算法派生的概率算法,用于确定非常大的集合的基数,不需要存储其所有值。Redis中的HLL是基于string结构实现的,单个HLL的内存永远小于16kb。
测量结果是概率性的,有小于**0.81%**的误差。
相关原理:https://juejin.cn/post/6844903785744056333#heading-0
指令:
PFADD key element [element...] :添加指定元素到 HyperLogLog 中PFCOUNT key [key ...]:返回给定 HyperLogLog 的基数估算值PFMERGE destkey sourcekey [sourcekey ...]:将多个 HyperLogLog 合并为一个 HyperLogLog
存储:stringRedisTemplate.opsForHyperLogLog().add("hll1",users);
统计:stringRedisTemplate.opsForHyperLogLog().size("hll1");